Step into summer with confidence with our collection of stunning summer white toe nail designs! Whether you prefer short and soft or long and glittery, we have designs to match every toenail type. From classic milky whites to bold rhinestone accents, our polish ideas are perfect for expressing your style. Get inspired by our matching ideas and create toenails with designs that are both chic and trendy. With prices that won’t break the bank, you can have fabulous nails all summer long
Neon Streaks of Summer Joy
Imagine the pure joy of summer captured on a canvas of white; that’s what this design evokes with its playful streaks of neon. It’s a bold statement of summer fun, a perfect match for the lively soul ready to enjoy the sun.

- Consumables:
- Base polish: Sally Hansen White On
- Neon polishes: Orly Neon Earth Collection
- Topcoat: INM Out The Door
Starting with a crisp white base, take each neon shade and with a thin brush, swipe a curve across each toenail. It’s like painting with the rays of a setting sun. Seal the art with a fast-drying topcoat to keep those colors vibrant.
Pink Blossoms and Crystals
There’s something about the combination of soft pink and the sparkle of crystals that screams summer romance. It’s a gentle nod to the beauty of nature’s blooms, with a bling factor that’s perfect for both day and night.
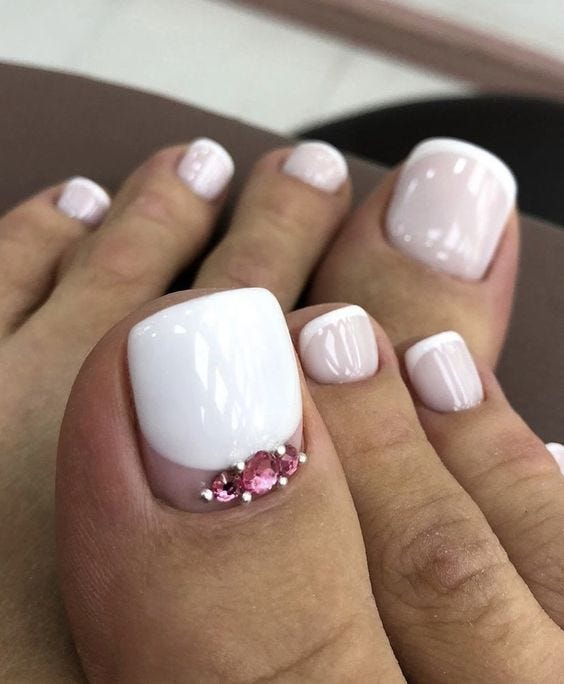
- Consumables:
- Base polish: Essie Blanc
- Pink crystals: Preciosa Flatback in Rose
- Adhesive: Gem Tac Glue
- Topcoat: Essie Gel Setter
Apply the white base, add a drop of glue where you want your bloom of crystals, and gently press them in place. The Gel Setter topcoat gives it a gel-like finish without the UV light fuss.
Blue and Glitter Gradient: Summer Sky on Your Toes
The gradient of blue to white is reminiscent of the clear summer sky meeting the white sandy beach. It’s an invitation to dip your toes into the ocean, metaphorically speaking, of course.
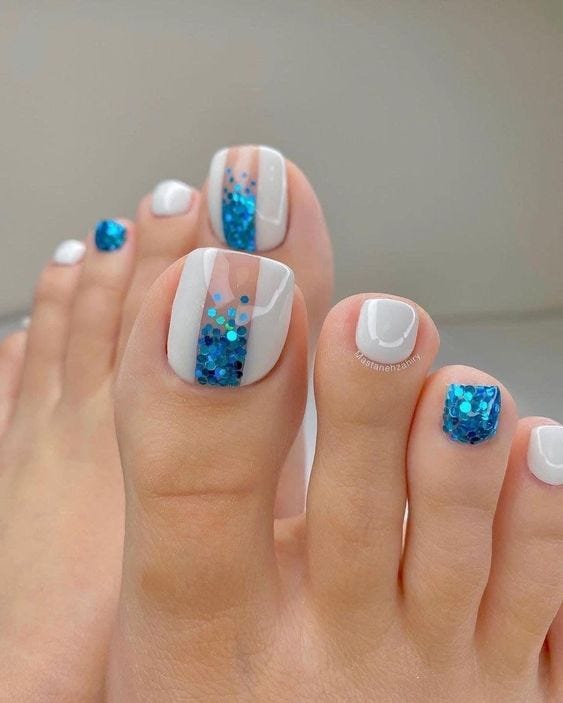
- Consumables:
- Base polish: OPI Funny Bunny
- Blue glitter: Blue My Mind by Holo Taco
- Sponge for gradient effect
- Topcoat: Butter London Hardwear P.D. Quick
Begin with your white base, then use a sponge to dab on the blue glitter from the tip, working your way down for a soft gradient. Finish with a topcoat that adds shine and durability.
Constellation Sparkle: A Universe at Your Feet
For those nights when you want your toes to twinkle like the night sky, this design is a must. It’s a celebration of glitter that makes you feel like you’re carrying a piece of the cosmos.
- Consumables:
- Base polish: China Glaze White on White
- Glitter polish: Starrily Neutrino
- Topcoat: ILNP Absolute Topcoat
After your white base, apply the glitter polish, focusing on the tip for a dense star effect. The ILNP topcoat is perfect for smoothing out the glittery texture.
Silver Flora: Elegance Defined
When you want a hint of luxury without going overboard, adorn your white toes with silver floral accents. It’s subtle, it’s elegant, and it’s utterly summer.
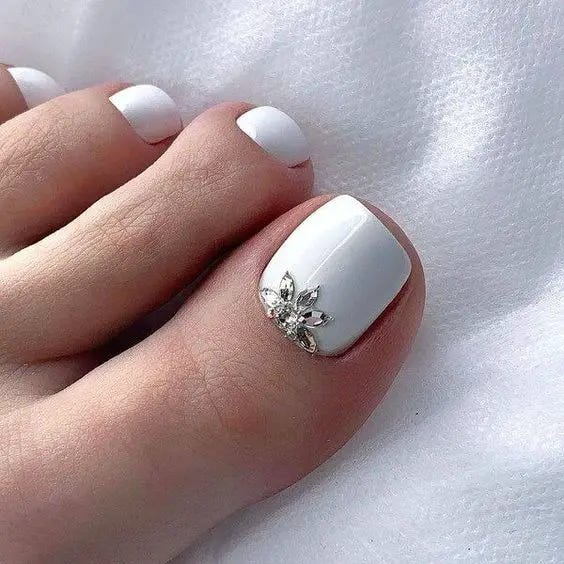
- Consumables:
- Base polish: Essie Tuck It In My Tux
- Silver nail stickers: Born Pretty Floral Decals
- Topcoat: Glisten & Glow Top Coat
Apply your white polish, place the silver decals with precision, and protect your design with a topcoat that promises longevity.
Delicate Floral Whispers
In this serene design, the white canvas is graced by the gentle touch of pink florals, evoking the soft caress of a summer breeze. It’s a design that whispers grace and exudes a delicate strength, much like the summer blooms that inspire it.

- Consumables:
- Base polish: Essie Marshmallow
- Pink nail art paint: Kiss Brush-On Nail Art Paint
- Detailing brush
- Topcoat: OPI Start to Finish
After laying down the base, use the detailing brush to hand-paint the florals with the art paint. The result? A masterpiece on your toes. Finish with a topcoat to protect your delicate design.
Milky Way Speckled with Stardust
This design takes the simplicity of white and elevates it with a speckled effect, reminiscent of a night sky dotted with stars. It’s an invitation to dream, a cosmic dance at your feet.
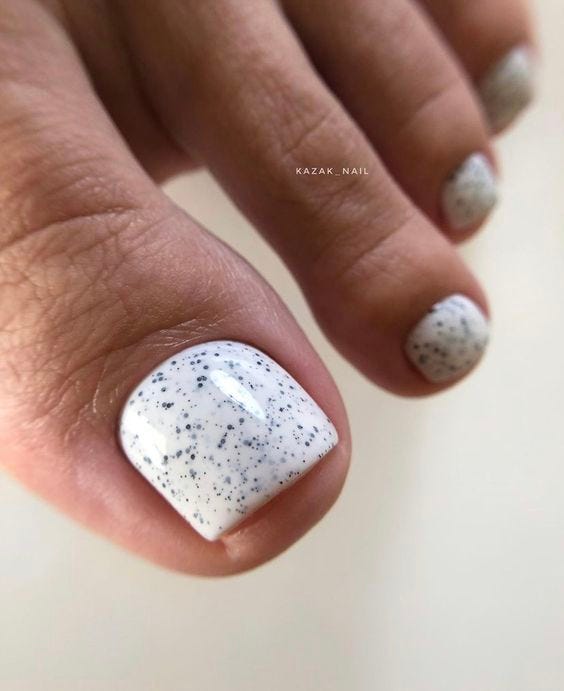
- Consumables:
- Base polish: Sally Hansen White Out
- Speckle polish: Cirque Colors Speckled Hen
- Topcoat: Essie Good To Go
One coat of your speckle polish over the white base is all it takes to achieve this look. Finish with a topcoat for a smooth feel.
Zebra Stripes: Unleashing the Wild Side
Black and white never looked so chic. These zebra stripes bring out the wild side of summer, a daring contrast to the serene white. It’s a bold statement that says you’re ready to stride into summer with confidence.
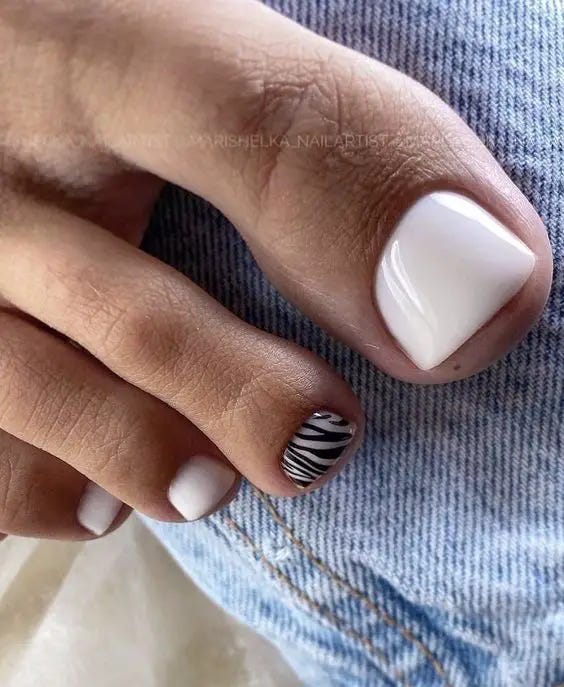
- Consumables:
- Base polish: OPI Alpine Snow
- Black striping polish: Stripe Rite in Black
- Topcoat: Seche Vite Dry Fast Top Coat
Using the striping polish, create thin zebra stripes over the white base. Each nail becomes a work of art. Seal your design with Seche Vite for a lasting finish.
Safari Chic: Stripes of Adventure
Taking inspiration from the majestic patterns of the African savannah, this zebra-stripe design offers an adventurous twist on the classic summer white. It’s a blend of sophistication and the call of the wild.
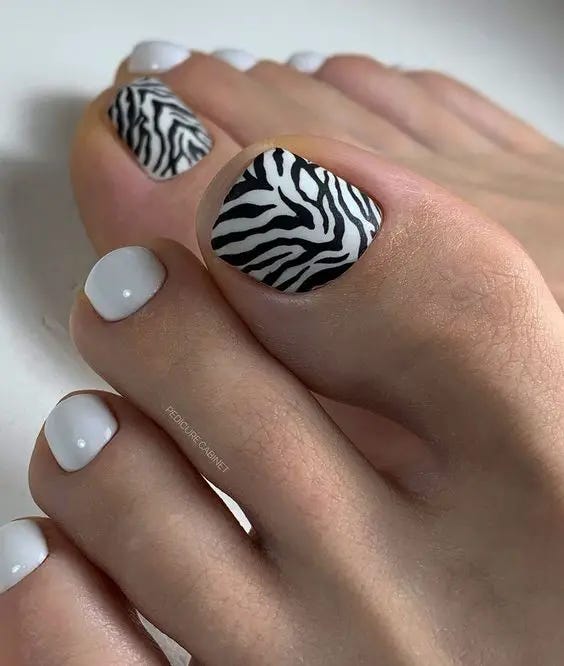
- Consumables:
- Base polish: ORLY White Tips
- Black nail art pen: Sally Hansen I Heart Nail Art Pen
- Topcoat: INM Out The Door Fast Drying Top Coat
The black nail art pen is the hero here, allowing for precise, freehand stripes. A quick swipe of the INM top coat ensures your safari chic nails are ready for the day’s journey.
Ethereal Elegance: Silver Linings
This look epitomizes the ethereal elegance of summer, with a fluid silver line that adds a modern twist to the classic white. It’s like capturing a single, beautiful cloud on a perfect summer day.
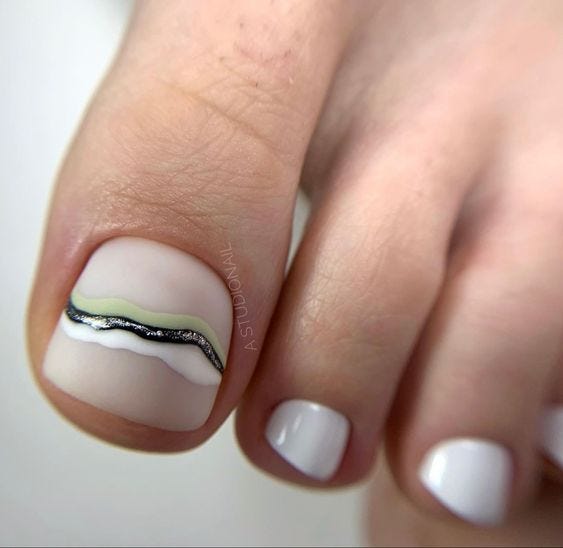
- Consumables:
- Base polish: CND Shellac in Cream Puff
- Silver striping tape
- Topcoat: OPI Top Coat
After the Shellac base, place the silver tape in your desired pattern. Apply the OPI topcoat to ensure the silver line melds seamlessly into your ethereal design.
Pops of Neon on Pristine White
Here’s a summer revelation: neon and white is a bold statement. Summer white toenail design with neon accents is not just a style, it’s an exclamation. The neon’s crisp lines speak of playfulness and impeccable chic. The square and clean white base is a canvas for summer creativity, and each toe can be painted in a different neon shade.

Essentials for Creation
- White polish: “Snow Me White” by Sinful Colors for the base.
- Neon polish: Pick shades from China Glaze’s Neon collection for the accents.
- Detailing brush: To get those crisp, clean lines.
DIY Manicure Steps
After a base coat, apply two layers of white polish. Let it dry completely. Dip your detailing brush in neon polish and with a steady hand, paint those bright lines at the tip. Finish with a clear top coat for a glossy effect that lasts.
Ocean Kissed Tips
A subtle ode to the ocean’s edge, this design carries the essence of waves kissing the shore. The milky white gradient, blending into a soft sky blue, topped with glitter like scattered sea foam, makes these square-shaped toenails a summer dream. The design whispers tales of tranquility and soft summer breezes.

Essentials for Creation
- Milky white polish: “Ballet Slippers” by Essie for the base.
- Blue gradient polish: “Bikini So Teeny” by Essie for the tip.
- Glitter: A sprinkle of “Set in Stones” by Essie to mimic sea foam.
DIY Manicure Steps
Start with the milky base and allow it to dry. Sponge on the blue polish gently, creating a gradient effect. While it’s still tacky, add a dash of glitter. Seal with a top coat for a smooth transition, like waves ebbing away.
Terrazzo Trend
The terrazzo flooring that adorns chic Italian homes has danced its way onto toenails. This design features specks of black, blue, and cream colors, creating a playful yet elegant design on a soft white base. The square shape adds a modern touch to this classic art form, reinvented for your summer white toe nail designs.

Essentials for Creation
- Soft white polish: Try “Marshmallow” by Essie as your starting point.
- Terrazzo flakes: Use small pieces of nail foils in various colors to achieve the look.
- Tweezers: To precisely place your terrazzo pieces.
DIY Manicure Steps
Once your white base is set, apply a sticky base coat where you want your flakes to adhere. Use tweezers to place each piece, then finish with a clear top coat for a smooth, pebble-like finish.
The French Twist
Revisiting the classic with a design that’s as timeless as it is modern — gel polish ensures longevity in this refreshed French manicure. The square tips are not only pristine white but also have the perfect nail shape to complement any summer style, whether it’s a casual outing or a classy soiree.
Essentials for Creation
- Gel polish: Use CND Shellac’s “Cream Puff” for the white tip.
- Gel top coat: For that lasting soft shine and durability.
- Gel lamp: To cure your polish to perfection.
DIY Manicure Steps
Paint the tip with your white gel polish, cure it, then apply your gel top coat. Cure again under the lamp, and you’re ready to wave your toes in the summer air.
Speckled Sophistication
Minimal yet mesmerizing, this design takes summer white toe nail designs to a place of subtle sophistication. The milky white base sprinkled with multicolored confetti-like specks gives off a carefree yet curated vibe, ideal for summer frolics and serious engagements alike.
Essentials for Creation
- Milky white polish: “Funny Bunny” by OPI creates a sheer yet impactful base.
- Confetti polish: “Party of Five Glitters” by Wet n Wild for that speckled look.
- A fine-tip brush: To strategically place glitter if you prefer precision.
DIY Manicure Steps
Apply your milky base and let it dry. Then, either dab on your confetti polish for a random speckled pattern or use a fine-tip brush to place each glitter piece where you want it. Finish with a high-gloss top coat for a long-lasting and protective seal.
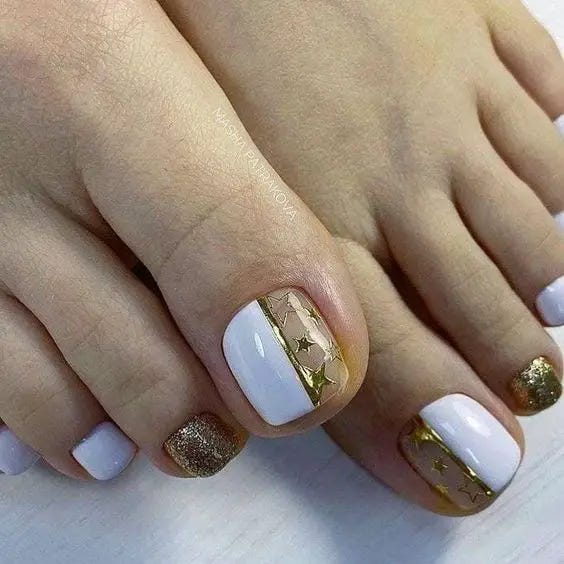
Gilded Elegance
In the header photo, the toes are adorned with a sublime combination of soft white and luxurious gold. This design is a nod towards luxurious yet understated summer glamor. A simple white base on most nails provides a clean look, while accent nails dazzle with gold foil patterns set against a creamy background, evoking the splendor of summer parties.
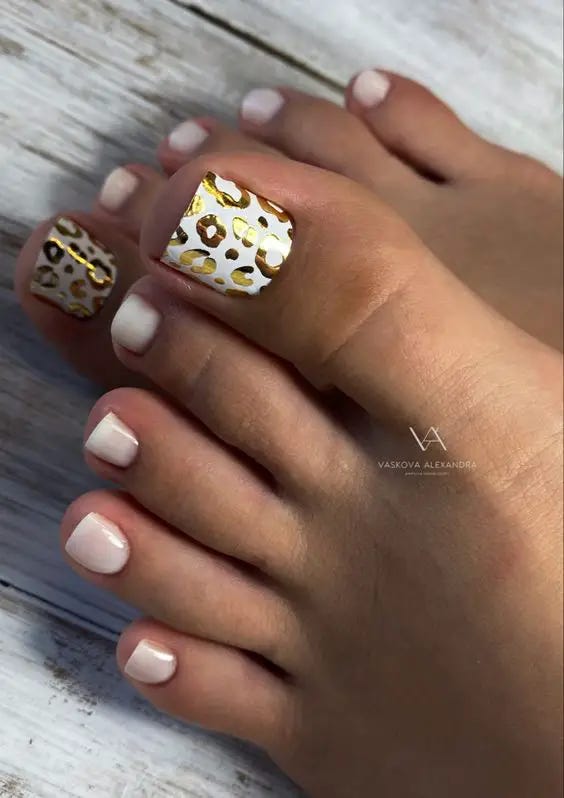
Essentials for Creation
- Creamy white polish: Essie’s “Tuck It In My Tux.”
- Gold foil: Artisanal nail art foil for the embellishment.
- Adhesive for foil: A clear foil glue to ensure perfect adhesion.
DIY Manicure Steps
After your base of creamy white, apply the foil adhesive on the accent nails and wait until it turns clear. Gently press the gold foil onto the nails, and seal all with a long-lasting top coat for a gel-like finish.
Polka Dots and Pastels
The image presents a playful approach to summer nail art. Classic polka dots parade across the sheer white background, creating a whimsical and airy design perfect for a lighthearted summer day. The matte finish on the polka dot pattern offers a modern twist, reflecting a carefree spirit.
Essentials for Creation
- Sheer white polish: “Private Weekend” by Essie.
- Dotting tool: For those perfect polka dots.
- Matte top coat: “Matte About You” by Essie for the contrasting finish.
DIY Manicure Steps
Apply two coats of sheer white polish. Once dry, dip your dotting tool in the same polish and create the polka dots. For a twist, apply a matte top coat over the dots only, leaving the rest glossy.
Geometric Gold
Gold lines intersect over a white background in the photo, creating a geometric marvel. This nail design epitomizes the chic, clean lines of summer fashion. It’s an artistic expression that’s both precise and playful, blending the classic white with a dash of metallic shimmer.
Essentials for Creation
- White polish: “White Page” by Sally Hansen.
- Gold striping tape: For clean, straight lines.
- Clear top coat: To ensure the tape stays in place.
DIY Manicure Steps
Once the white base is dry, apply the striping tape in your desired pattern. Trim any excess and seal with a top coat for a design that’s both striking and durable through summer’s adventures.
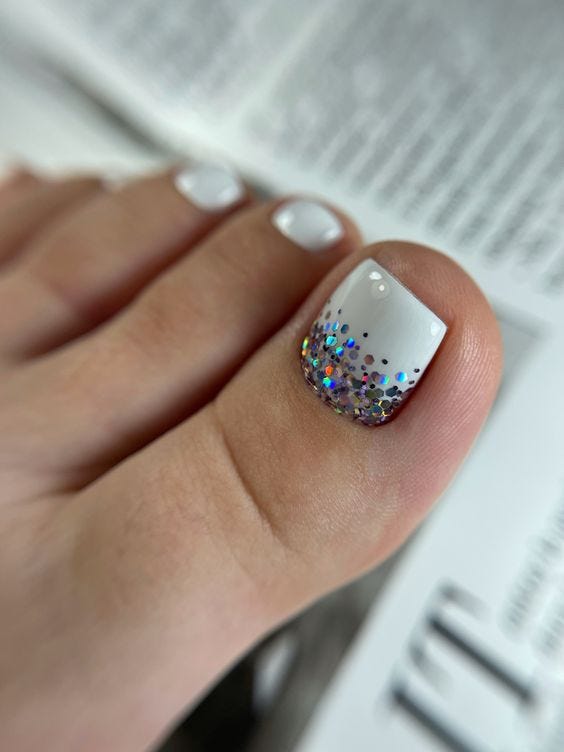
Silver Splendor
Captures an edgy yet elegant nail design. One nail is completely enveloped in silver glitter, standing boldly amongst the solid white, reminiscent of summer nights lit by shimmering stars. The contrast of textures between the creamy white and the metallic glitter makes for an alluring display.
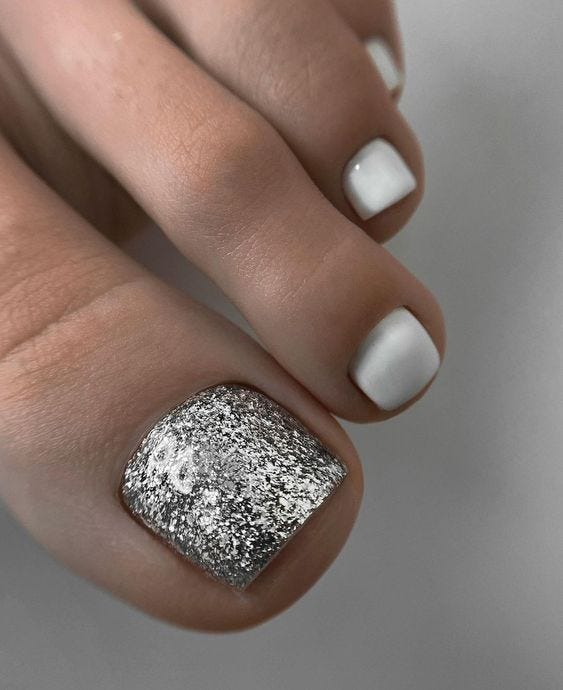
Essentials for Creation
- White polish: “Blanc” by Essie for the base.
- Silver glitter polish: “Rock at the Top” by Essie for the feature nail.
- A sponge: To pack on the glitter for full opacity.
DIY Manicure Steps
Apply your base color. For the glitter nail, apply a layer of silver glitter polish, then use a sponge to add a second layer for dense coverage. Seal with a glossy top coat for added shine.


0 Comments