Get inspired this summer with our chic collection of red summer nails Shades & designs! Whether you’re into trendy coral or classic cherry, we have the perfect polish to match your vibe. From short and sweet to long and almond-shaped, our nail art ideas cater to all preferences. Try a simple yet elegant design for a day at the beach or go bold with bright neon accents for a night out. With prices this affordable, you can experiment with different looks all season long!
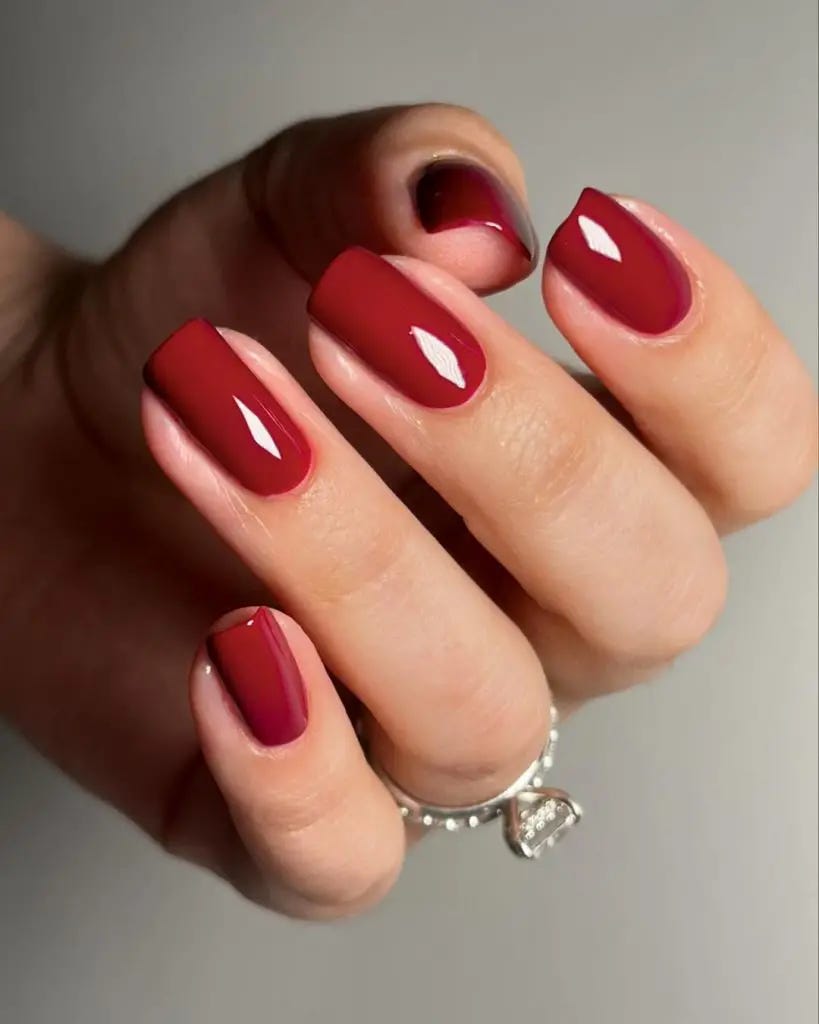
Deep Wine: A Toast to Summer Nights
As the sun sets, the mood shifts to a deeper, more mysterious wine — the perfect homage to sultry summer evenings.
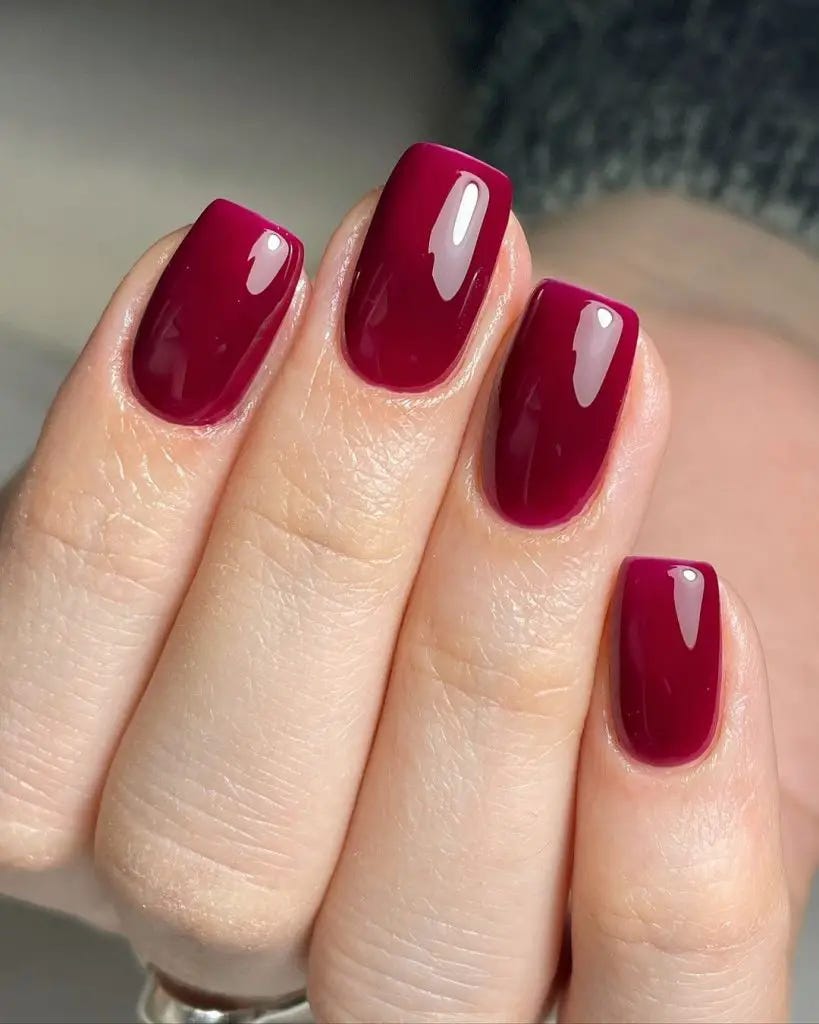
My Professional Opinion: This shade is evocative of a fine merlot, speaking to the soul that appreciates a more subdued yet equally captivating summer palette. The depth of this color is reminiscent of dark cherry, holding within it the secrets of summer nights yet to unfold. The impeccable gloss finish suggests a design that’s both elegant and daringly trendy.
Consumables for Creating This Design:
- Deep wine red polish, embodying the rich tones of summer’s darker side
- A high-shine top coat for that glass-like finish
- A fine nail file for shaping nails to a sophisticated, rounded tip
DIY Tips: Apply your wine red polish in even layers, ensuring each coat is dry before the next. Precision is key — clean up any edges to keep the look sharp. The top coat is vital for both protection and that desirable shine, reminiscent of a calm, reflective evening by the sea.
Playful Patterns: Red’s Artistic Side
When red summer nails meet the imaginative realm of patterns, the result is nothing short of spectacular.
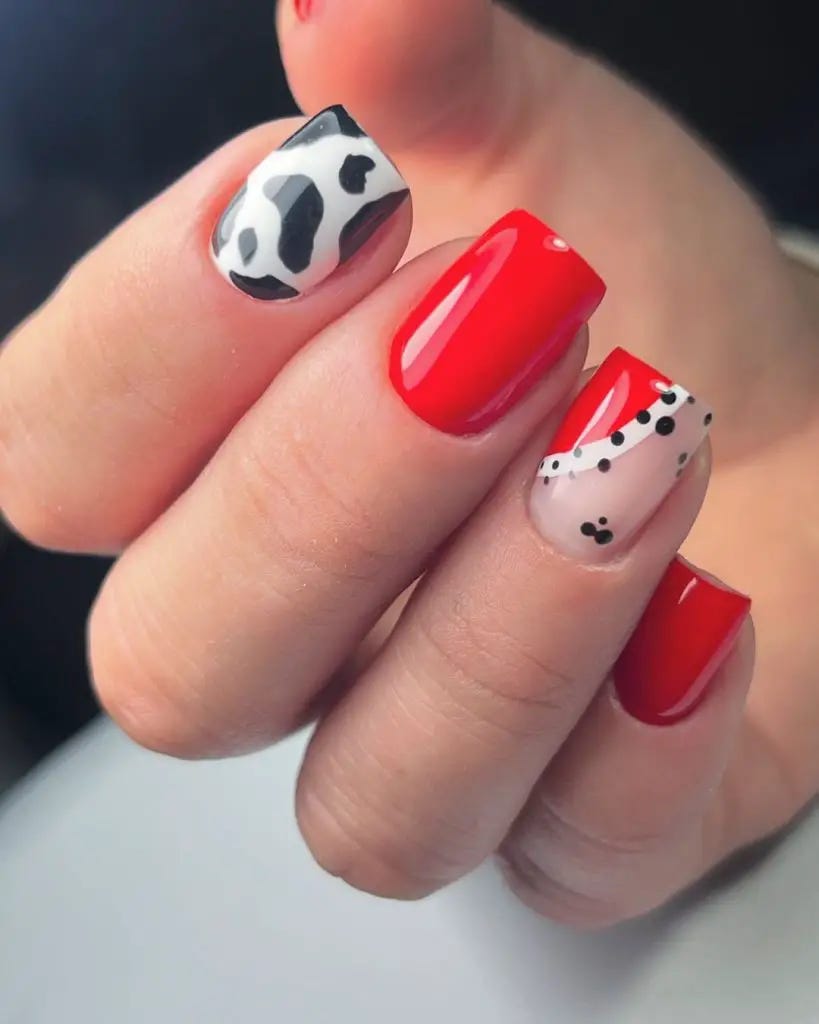
My Professional Opinion: In this design, the boldness of red is paired with the playful contrast of black and white patterns. The choice of one nail in a cow print and another with dainty polka dots against a light base is unique, offering a fun twist on a classic bright summer nail. The alternating solid red nails keep the look cohesive and trendy.
Consumables for Creating This Design:
- Bright red nail polish for the bold statement nails
- White polish as a base for the patterned nails
- Black nail polish or a fine-tip pen for detailed art
- A dotting tool for the polka dots
DIY Tips: After prepping your nails with a base coat, alternate between painting solid red nails and white bases for the art. Use a fine-tip pen or a small brush for the cow print, and a dotting tool for the polka dots. Finish with a glossy top coat to seal the designs art ideas.
The Sleek Stiletto: Red’s Edgy Elegance
Stiletto nails aren’t just a style; they’re a statement. With a bold red, they’re the epitome of edgy elegance.
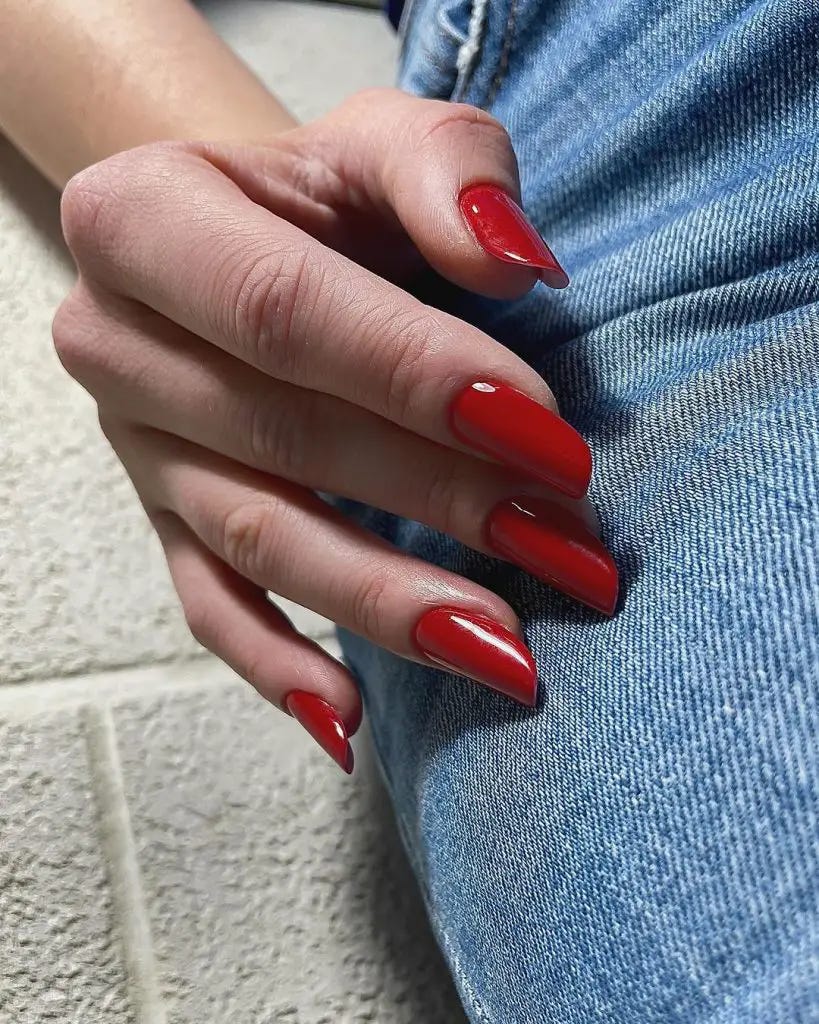
My Professional Opinion: The glossy red on these stiletto nails is nothing less than a power move. Perfect for those who love to marry trendy with unique, this bright shade captures the summer trends while offering a dash of daring sophistication. The shape is as fun as it is chic, ensuring every gesture cannot go unnoticed.
Consumables for Creating This Design:
- A bright red nail polish that speaks confidence
- A quality top coat for a durable, glossy finish
- Nail adhesive for those opting for extensions
DIY Tips: Achieving the stiletto shape may require extensions or a good nail file if your nails are long enough. Once shaped, apply two coats of your chosen red and finish with a high-shine top coat for a lasting impression.
Modern French with a Twist of Red
The modern French manicure embraces bold colors, and red adds just the right amount of flair to this beloved classic.
My Professional Opinion: This simple yet design classy take on the French manicure uses a deep red hue to highlight the tips over a sheer pink base. The addition of a single white and red striped nail introduces an element of playfulness. It’s a fresh take on summer nails that’s both aesthetic and unique.
Consumables for Creating This Design:
- Sheer pink nail polish for the base
- Deep red nail polish for the French tips
- White nail polish for the striped accent
- Striping tape for clean lines
DIY Tips: After applying the pink base, use striping tape to create flawless red tips. For the accent nail, apply white polish as a base, then add red stripes with the help of striping tape. Finish with a top coat for a set that blends world styles with personal creativity.
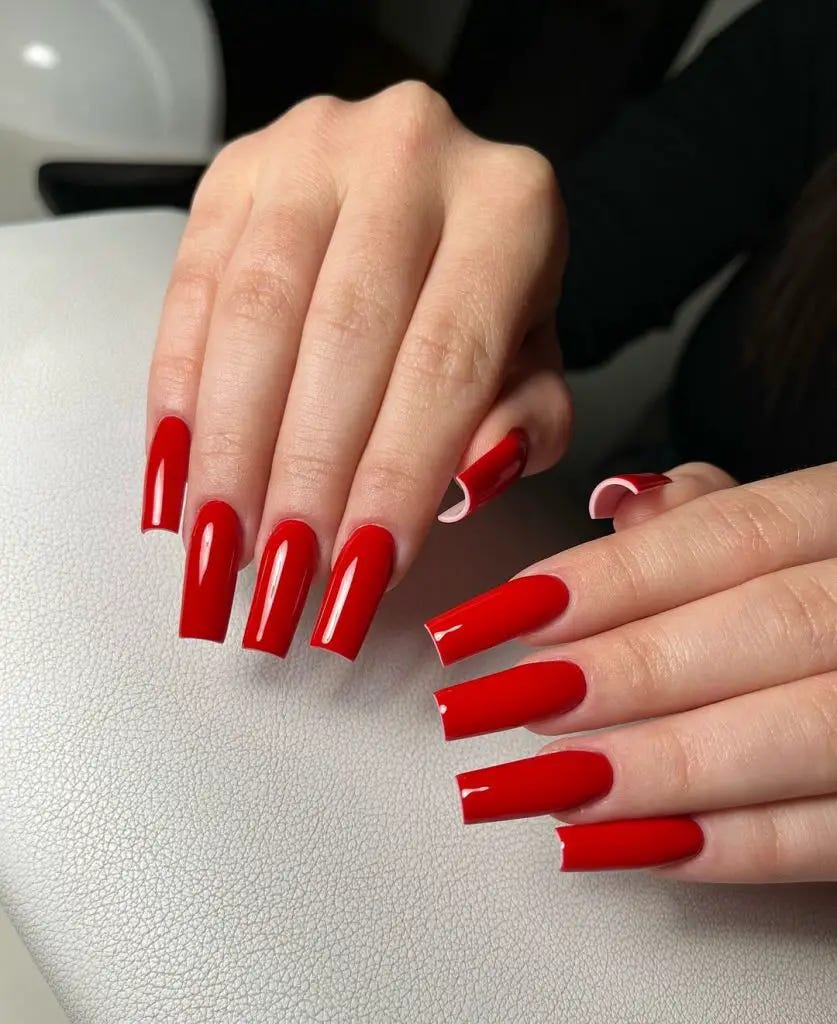
The Classic Red: Timeless Elegance Meets Summer Flare
The image captures the quintessential classic red manicure, polished to a shine that reflects the summer sun. The medium length, combined with a rounded square shape, offers a timeless look that breathes both elegance and functionality. It’s a color that screams confidence and pairs beautifully with any summer outfit, be it a flowing white dress or a fun beach set.
Consumables for This Manicure:
- Base Coat: A durable base, like OPI Natural Nail Base Coat.
- Red Polish: A bright, true red, such as OPI’s “Big Apple Red”.
- Top Coat: A glossy finish with OPI Top Coat for enduring shine.
- Cuticle Oil: To ensure a neat finish and healthy nails.
As a professional, I stand by OPI for their rich pigment and long-lasting formula. Remember, the secret to a perfect classic red is in the application.
DIY Nail Design Tips: To recreate this look at home, start with clean, shaped nails. Apply the base coat, followed by two coats of your red polish, allowing each to dry thoroughly. Finish with a top coat for that professional gloss. Always paint in thin, even strokes for a streak-free finish.
Coral Infusion: A Twist on Tradition
This look represents a summer twist on the red palette — coral color. The nails are long and cute, perfectly shaped and covered in a coral shade combining red with a hint of orange. This color is perfect for both a daytime outing and a summer evening ball.
Consumables for This Manicure:
- Base Coat: Sally Hansen Double Duty Base & Top Coat.
- Coral Polish: Essie’s “Tart Deco” for a punchy coral.
- Top Coat: Seche Vite Dry Fast Top Coat for a quick dry.
- Accent Stones: Optional rhinestone bling to add sparkle.
I recommend Essie for their on-trend colors and easy application. Adding a tiny accent can take this fun shade to new heights of chic.
DIY Nail Design Tips: Ensure your nails are buffed and filed into your desired shape. Apply the base, two layers of the coral polish, then seal with the top coat. If you fancy a bit of bling, place rhinestones using a dab of top coat as glue.
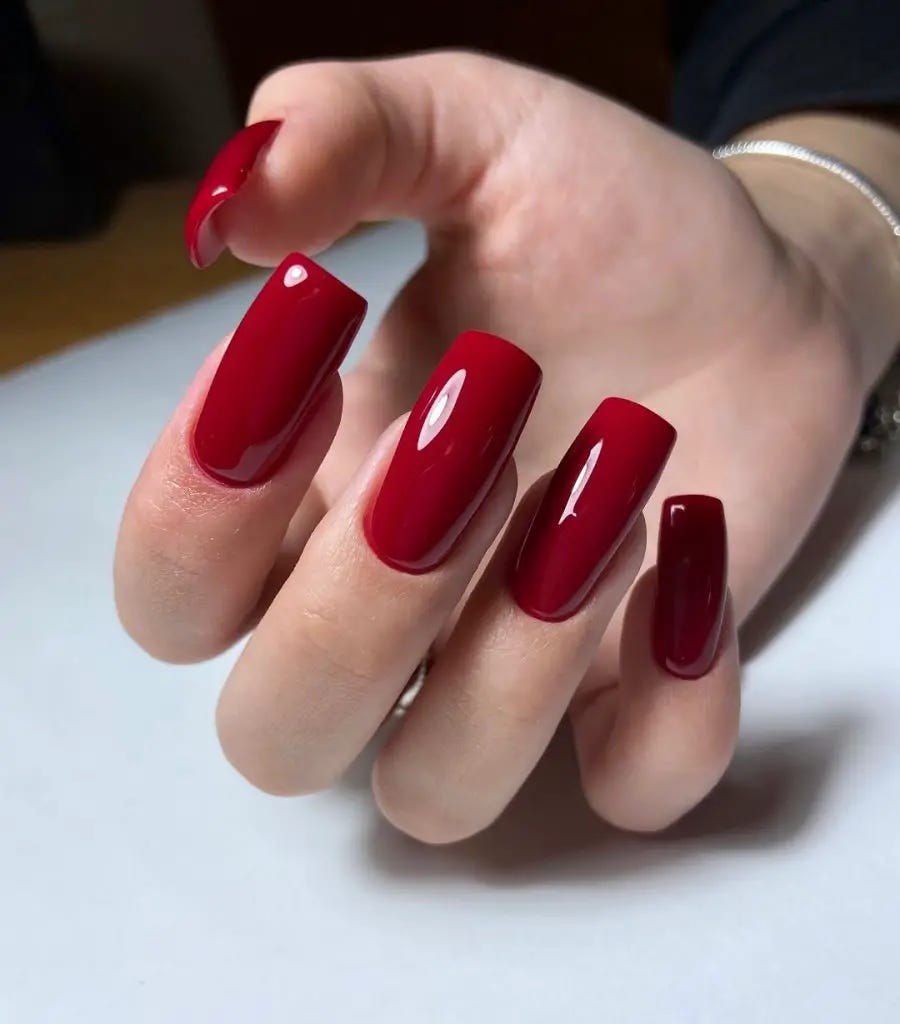
The Dark Cherry: Sophisticated Summer Nights
Transition to the evening look with dark cherry. This nail design embodies the sultry side of summer with its deep wine red hue and elegant shape. It’s both alluring and mysterious at the same time, perfect for summer nights under the stars.
Consumables for This Manicure:
- Base Coat: Butter London Nail Foundation Priming Basecoat.
- Dark Cherry Polish: Chanel Le Vernis Longwear Nail Colour in “Rouge Noir”.
- Top Coat: Deborah Lippmann Gel Lab Pro for a plump finish.
- Shaping tool: For precise shaping.
Choosing Chanel’s Rouge Noir is opting for luxury and unparalleled depth in color, making it worth the price for that aesthetic appeal.
DIY nail design tips: Prepare your nails by giving them a square shape with light file strokes. Apply a base coat, two coats of dark cherry polish and finish with a gel polish to give your nails a professional look. Allow enough time for drying.
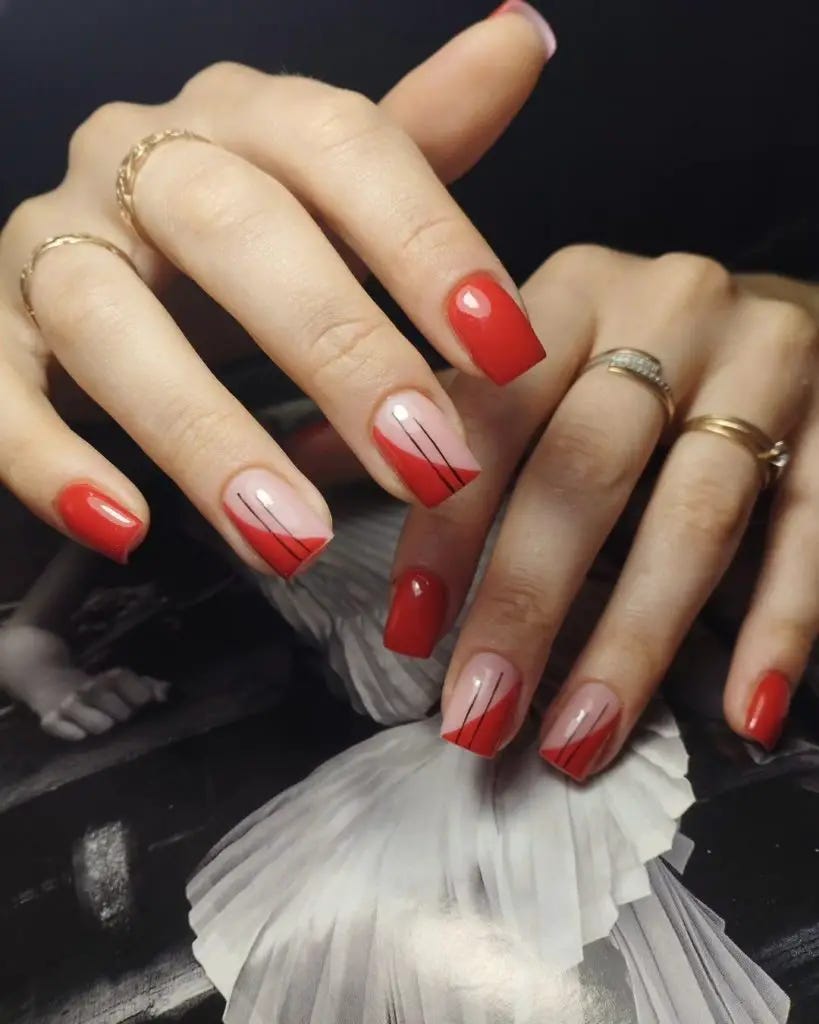
Summer Artistry: Creative Red Designs
Summer is the time to get playful with your nail art ideas, and this design does just that. Combining the classic red with artistic lines, it captures a unique and creative essence. It’s a simple yet striking statement that showcases personality and style.
Consumables for This Manicure:
- Base Coat: CND Stickey Base Coat for a lasting hold.
- Red Polish: For the main color, try “Red Hot Rio” by OPI.
- Black Polish: Use a fine-tipped brush with Essie’s “Licorice” for detail.
- Top Coat: Finish off with a layer of ORLY Glosser for high shine.
When selecting polish for art designs, the key is to find formulas that won’t thicken too quickly as you work on your details.
DIY Nail Design Tips: With clean, prepped nails, lay down your base coat. Once dry, apply the red polish. For the art, dip a fine brush into black polish and sketch your designs. Steady hands are a must for clean lines. Seal with a top coat for a dazzling finish.
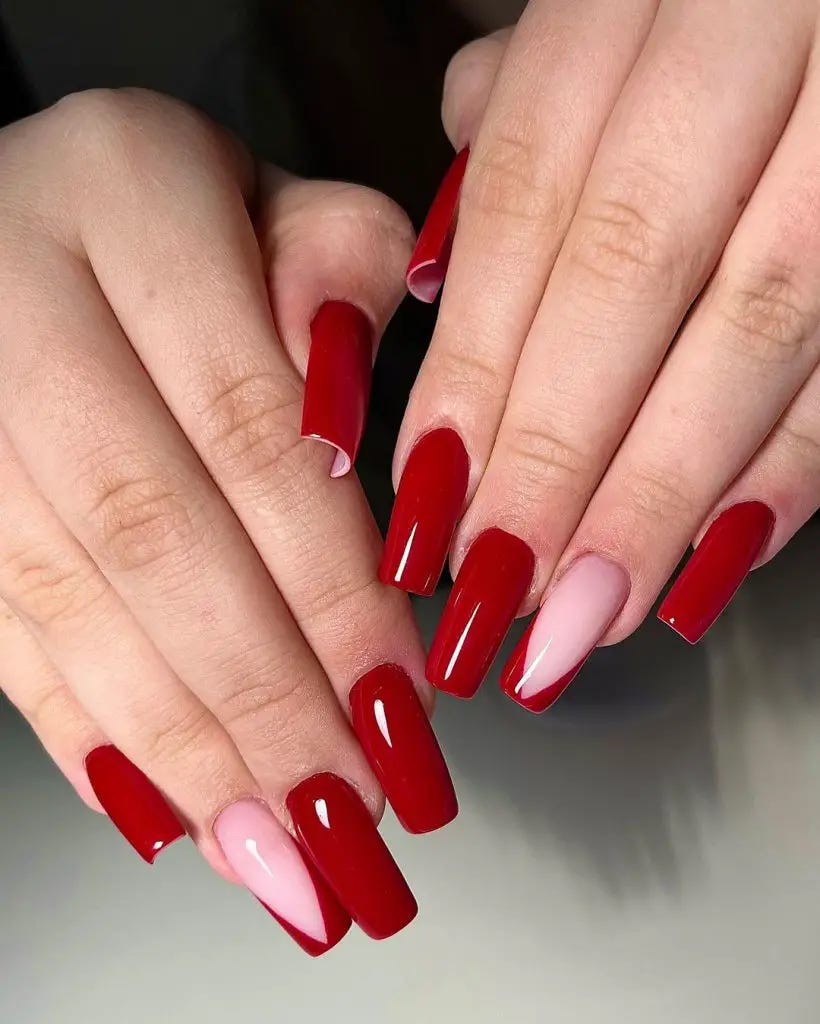
Red and White Elegance: A Chic Summer French
The French manicure, a timeless classic, is reimagined here with a bold red and delicate white tip, ideal for those summer weddings or a chic outing. This design is refined, with a playful twist on the traditional French, demonstrating that sometimes, it’s the simplest of changes that create the most impactful statements.
Consumables for This Manicure:
- Base Coat: ORLY Bonder Rubberized Basecoat.
- Red Polish: A creamy and vibrant “Fiery Red” by Butter London.
- White Polish: For crisp tips, use “Blanc” by Essie.
- Top Coat: A fast-drying top coat like Seche Vite.
For a French design, precision in the polish is crucial for that crisp line. I recommend Butter London for its rich creams and Essie for the purest white.
DIY Nail Design Tips: Post base coat, apply two coats of red polish. For the French tip, use a thin brush or nail tape for precision, applying the white polish. Finish with a swipe of your top coat for a seamless and glossy manicure.
The Lustrous Deep Red: Luxurious Shine and Elegance
The depth and luster of this red manicure are reminiscent of a fine Bordeaux wine. The perfect curvature and smooth surface reflect a meticulous application, showcasing a luxurious and elegant look suitable for any upscale summer event or a sophisticated night out.
Consumables for This Manicure:
- Base Coat: Deborah Lippmann’s ‘Hard Rock’ nail strengthening base and top coat.
- Red Polish: A luscious deep red, like “Lincoln Park After Dark” by OPI.
- Top Coat: A high-gloss top coat from the Essie Gel Couture line for that glassy finish.
- Nail Oil: A touch of CND SolarOil to keep cuticles moisturized.
I always find that a deep red with a glossy finish is a statement of refined taste; it’s both classic and deeply sensual.
DIY Nail Design Tips: After a base coat, apply your chosen deep red polish in thin, even layers to prevent any bubbling. Once dry, apply a top coat for that enviable shine. For maintenance, rub nail oil into your cuticles nightly to keep the skin soft and the nails strong.
The Almond Red Elegance: A Touch of Vintage Glamour
The image shows a stunning example of almond-shaped nails painted in a bold, dark red shade that suggests both vintage glamour and modern chic. The impeccable shine and sharp tips provide a luxurious look that’s undeniably feminine and daring.

Consumables for This Manicure:
- Base Coat: Start with a layer of ORLY’s Rubberized Basecoat.
- Dark Red Polish: “Lost on Lombard” by OPI delivers that rich, dark hue.
- Top Coat: Add a lasting shine with Sally Hansen’s Insta-Dri Top Coat.
- Almond Shaping Tool: To achieve the perfect almond shape, a reliable nail file is essential.
This shade and shape are all about channeling your inner Hollywood siren with a modern twist, making it perfect for trendy summer nights.
DIY Nail Design Tips: Shape your nails into the almond shape before polishing. Apply your base coat, two coats of dark red polish, and then a quick-dry top coat for a sleek finish. Precision in shaping is key for the almond silhouette to truly stand out.
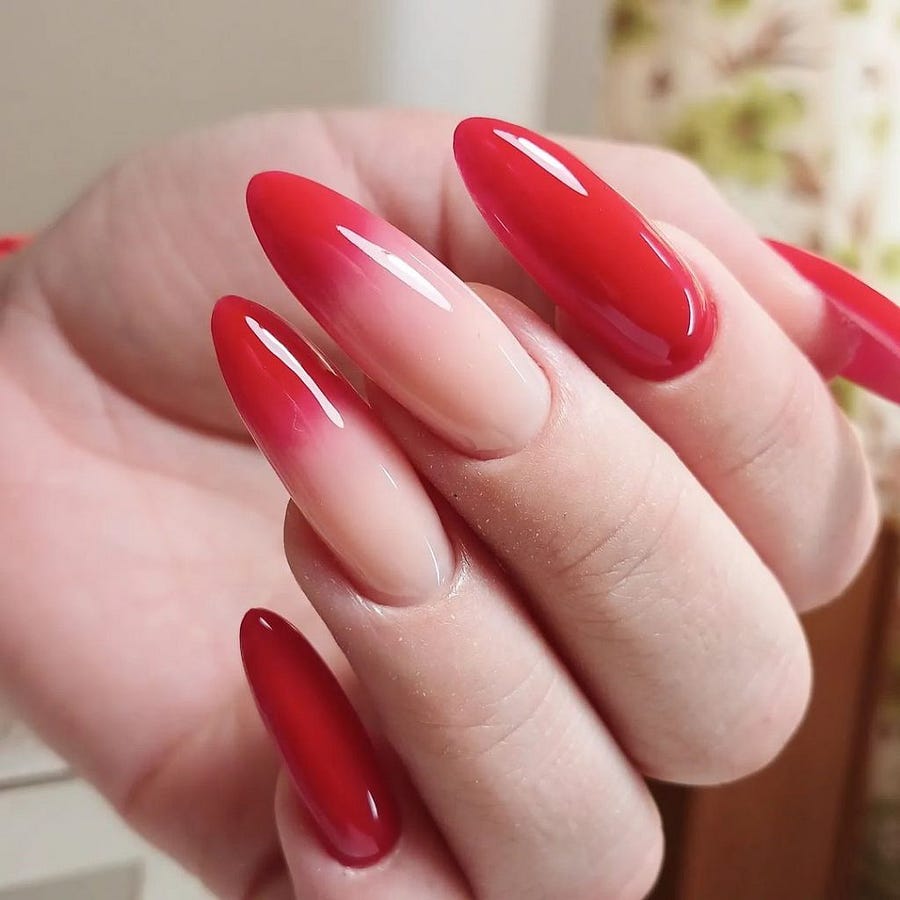
Summer Sunset: Gradient Elegance
This design captures the ephemeral beauty of a summer sunset with its gradient from a bright coral at the tips to a light, natural pink at the base. It’s a vibrant choice that’s both playful and elegant, perfectly embodying the spirit of a carefree summer.
Consumables for This Manicure:
- Base Coat: Use a sheer pink base, like Essie’s “Ballet Slippers.”
- Red Polish: For the gradient, “Aperitif” by Essie at the tips.
- Sponge: A makeup sponge to blend the gradient transition.
- Top Coat: A layer of Seche Vite Dry Fast Top Coat to meld the colors.
The gradient look is definitely a summer trend that requires a bit of practice, but the result is always a show-stopper.
DIY Nail Design Tips: After your base coat, apply the lighter polish as a base color. Dab the brighter red onto a sponge and lightly press it onto the nail tip, blending towards the middle. Seal with a top coat to smooth any texture and to enhance the colors’ transition.
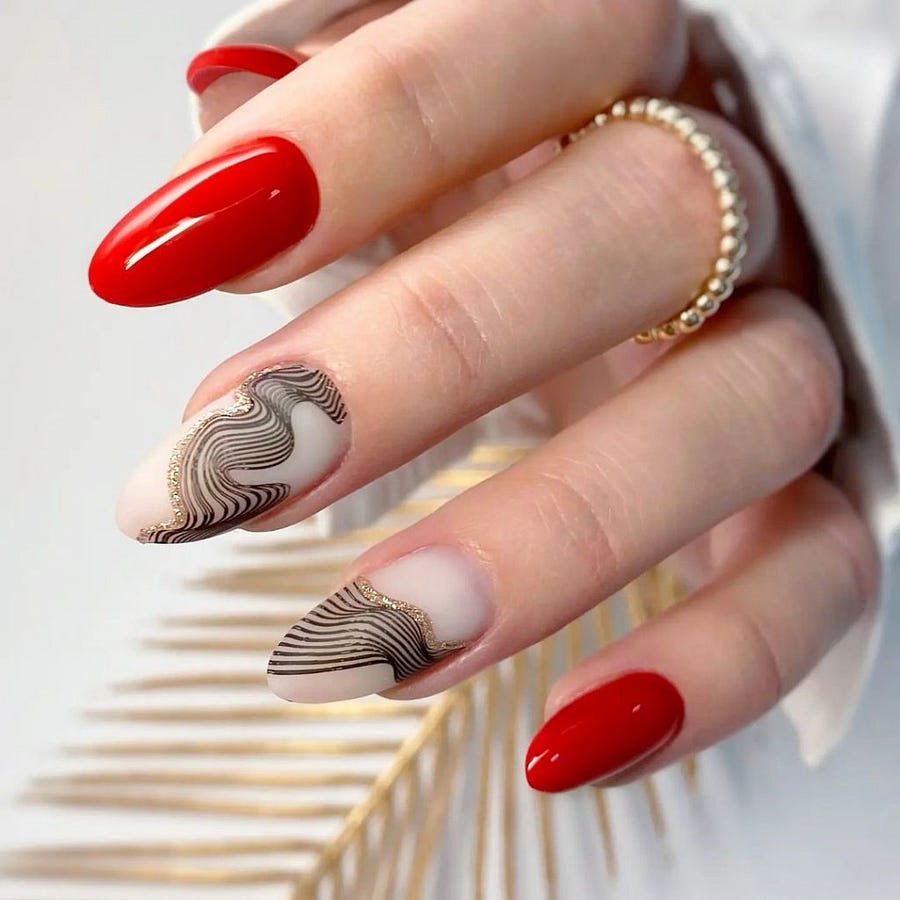
The Modern Art Deco: Red with a Twist of Sophistication
Here we have a design that’s nothing short of a wearable piece of art. The alternating red and artistic pattern on the ring fingers provide a balance of classic red and modern aesthetics. It’s a perfect manicure for those who appreciate a touch of artistry in their look.
Consumables for This Manicure:
- Base Coat: A layer of Zoya Anchor Base Coat for long wear.
- Red Polish: “Really Red” by Essie is a perfect vibrant choice.
- Art Deco Stickers: For the pattern, use nail art stickers or stencils.
- Gold Glitter: A fine line of gold glitter polish to outline the art deco pattern.
- Top Coat: CND Vinylux Long Wear Top Coat for durability.
As an expert, I adore combining straightforward shades with intricate designs to make each finger a statement in itself. This design does just that, with a dash of golden glitz for added summer radiance.
DIY Nail Design Tips: Apply a base coat, followed by two coats of red on all but the ring fingers. For the art deco design, place the sticker or use a stencil as a guide for the pattern. Apply a thin line of gold glitter polish to accentuate the design. A steady hand and a bit of patience go a long way in achieving this sophisticated look. Finish with a durable top coat to protect both color and design.
The Matte Red Muse: Bold and Understated
This image showcases a bold red manicure with a modern matte finish, offering an understated yet powerful statement. The matte texture adds depth to the color, making it a chic and trendy choice for any summer adventure, be it a city escapade or a seaside retreat.
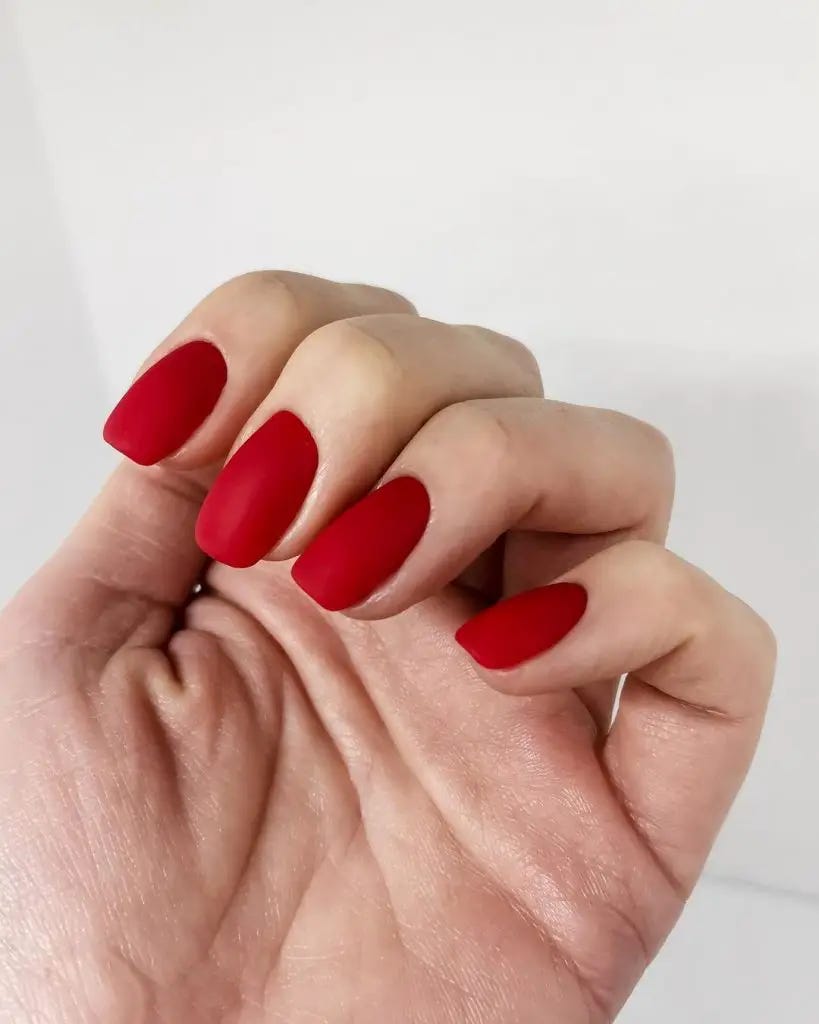
Consumables for This Manicure:
- Base Coat: Essie’s “Grow Stronger” Base Coat to fortify nails.
- Red Polish: “Russian Roulette” by Essie for a bright, bold red.
- Matte Top Coat: OPI Matte Top Coat to transform any gloss finish to a velvet matte.
- Cuticle Oil: To keep the matte looking fresh, not dry.
A matte finish is perfect for those who want to stand out in a more subtle, refined way. It’s a fresh take on the classic red that’s both unique and incredibly trendy.
DIY Nail Design Tips: After applying your base coat, layer on the red polish evenly. Once dry, apply the matte top coat for that suave, velvety finish. Remember, matte top coats dry quickly, so work swiftly to avoid streaks. Cuticle oil will keep your nails and skin hydrated without affecting the matte look.
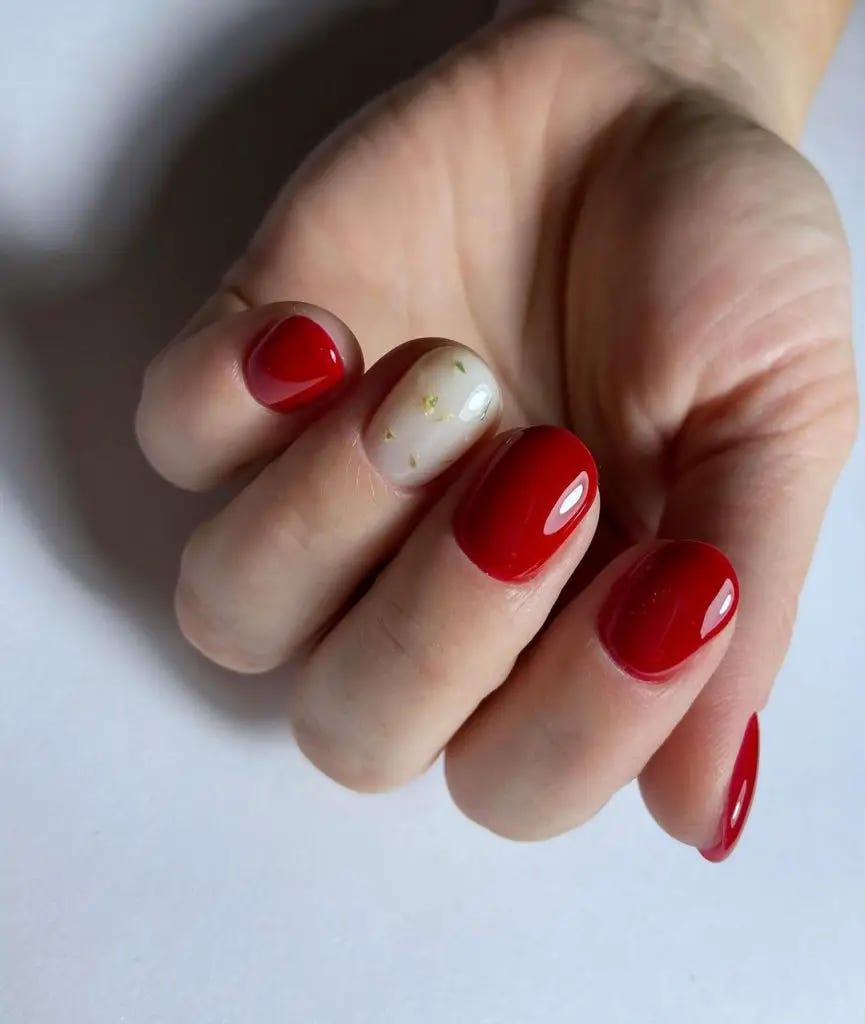
Floral Red Accents: A Symphony of Color and Design
The marriage of brilliant red with delicate floral art on these nails is like a summer garden brought to life. The glossy red on the majority of the fingers gives a bold base, while the artistry of the florals adds a touch of whimsy and femininity, perfect for a summer dress or denim pairing.
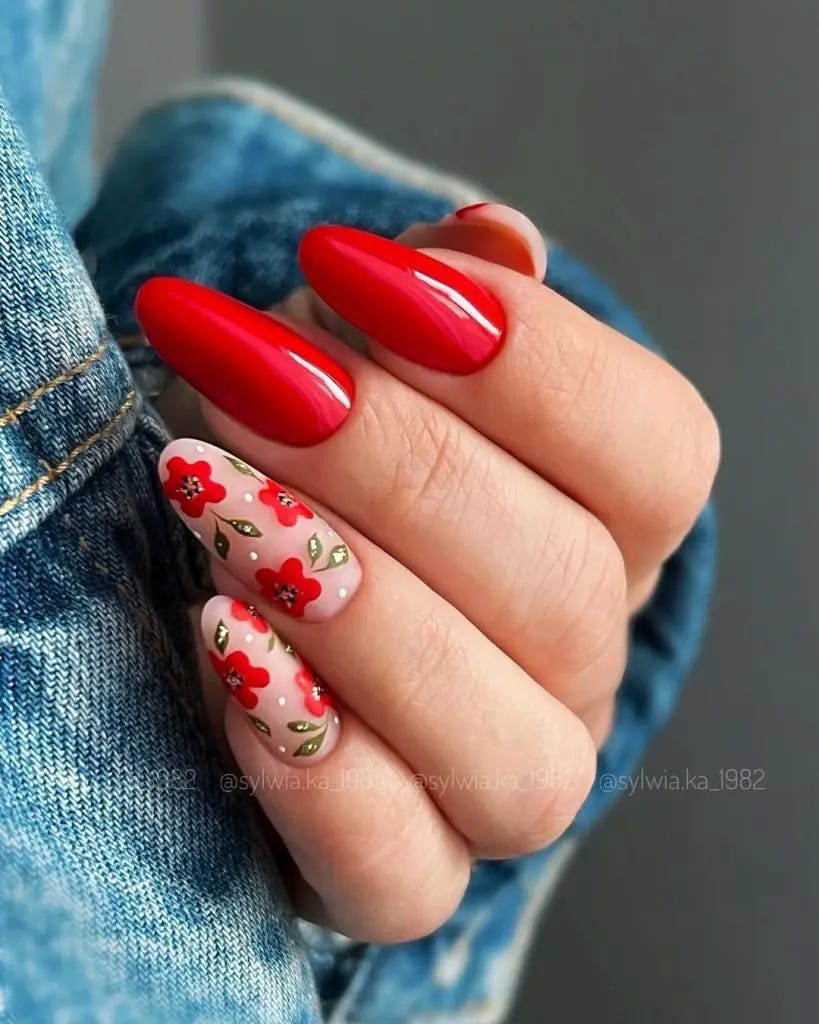
Consumables for This Manicure:
- Base Coat: ORLY Bonder Rubberized Basecoat for a sticky surface.
- Red Polish: “Geranium” by Essie for a vibrant pop of color.
- White Polish: “Alpine Snow” by OPI for the flower base.
- Detailing Brush: A fine-tip brush for intricate designs.
- Top Coat: A glossy top coat from Seche Vite for a lasting shine.
The floral pattern is a nod to vintage prints, yet it feels utterly modern and chic when set against the glossy red backdrop.
DIY Nail Design Tips: Start with a protective base coat. Then, apply the red polish on all fingers except the ones you choose for the floral design. For the florals, paint a white base and let it dry. Then, with a fine-tip brush, create the floral patterns in red with green accents. Finish with a glossy top coat to seal in the design and enhance the colors.
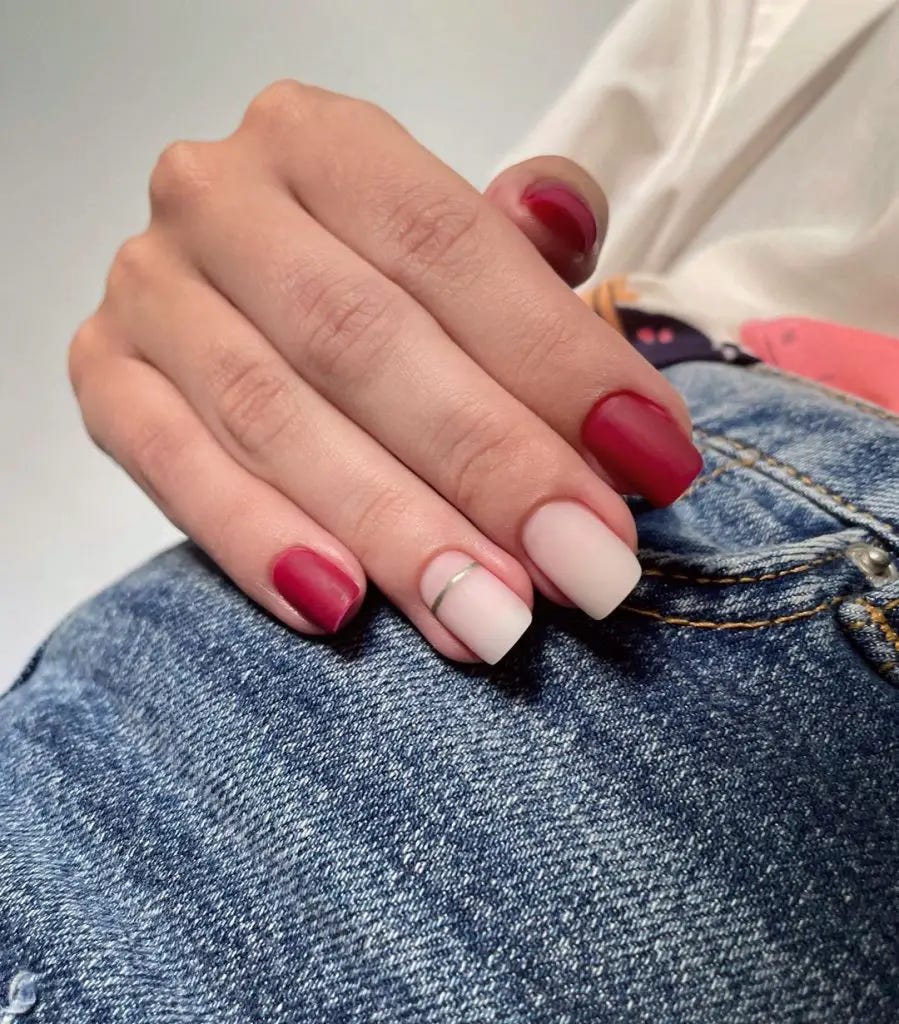
Red and White Whispers: The Art of Subtlety
This design speaks to the minimalist who delights in subtlety. The contrast of matte and glossy finishes provides a modern twist, and the simple white line art over the bold red base offers an enigmatic allure. It’s the perfect choice for someone who loves a narrative in their style.
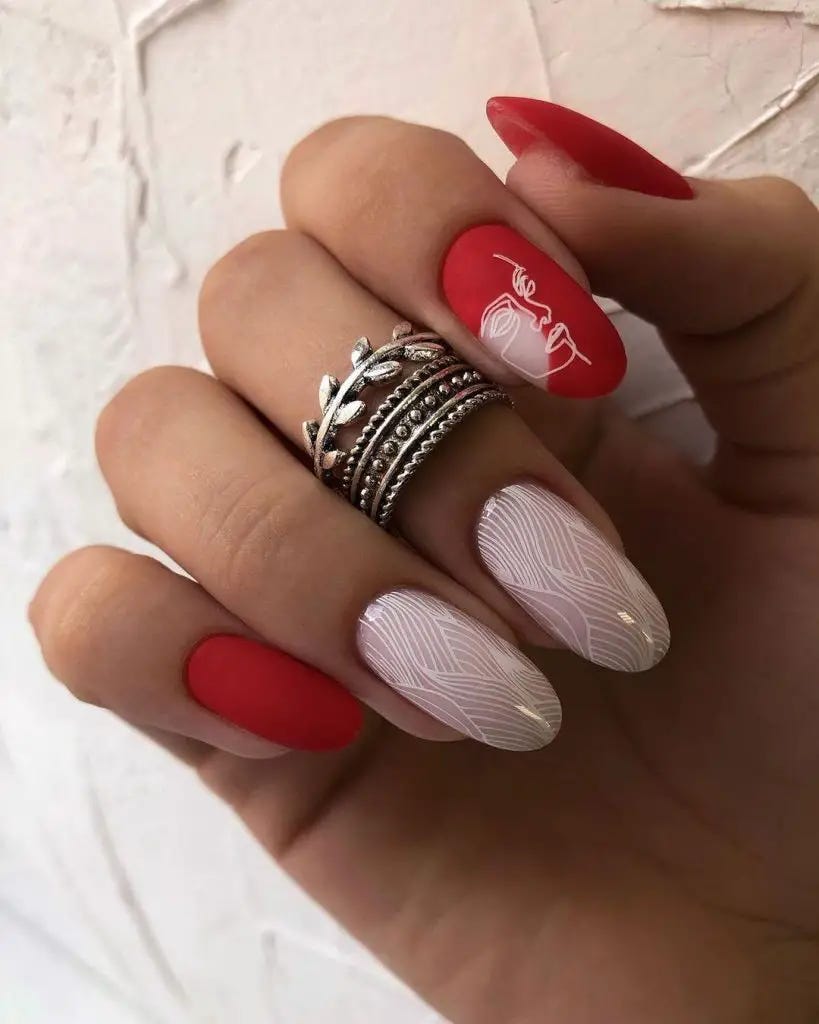
Consumables for This Manicure:
- Base Coat: Start with Essie’s “Here to Stay” base coat.
- Red Matte Polish: Try “Matte About You” by Essie for the red.
- White Art Polish: For the line art, “White On” by Sally Hansen.
- Matte Top Coat: For the fingers that remain glossy, use OPI Matte Top Coat on the others.
The juxtaposition of matte and glossy encapsulates a designer’s touch, ideal for fashion-forward individuals.
DIY Nail Design Tips: Post base coat, apply the red polish. Once it’s dry, use a thin brush to paint on white line art for an abstract effect. Apply a matte top coat over the red nails, leaving the art nails glossy for a mixed finish that catches the eye.


0 Comments